In this article, we will learn how you can create a blockchain with Golang. But you may wonder, what a blockchain is. A public database that is decentralized and distributed (spread across) numerous peers is referred to as a blockchain. Blockchain enables self-correction of the database, even if a node is generating erroneous data.
A block on a blockchain typically comprises information that we share in the database (called the data), a hash, and the cryptographic hash of the preceding block.
Now that you know the preliminary concept, let us begin.
Beginning with a New Directory
To begin with, let us create a new directory. We’ll assume that the name of the directory is ‘blockchain’. In Command Prompt, we’ll create the directory and if you are on macOS or Linux system, then you will have to use Terminal.
cd go-workspace
mkdir blockchain
cd blockchain
code .
I have VS Code installed in my system. You may use any other text editor or IDE. Next, we will build a Go module.
go mod init github.com/golang-company/blockchain
Now, let us get to the fun part of the blockchain with Golang.
Starting with the Code in main.go
In the Go source file ‘main.go’ (that we create under the directory ‘blockchain’), we will code the main logic of the program.
package main
import (
“bytes”
“crypto/sha256”
“fmt”
)
type Cryptoblock struct {
Hash [] byte
Data [] byte
PrevHash [] byte
}
- At this point, you need to know is that we have created a struct called Cryptoblock. And it consists of three data fields like Hash [], Data [], and PrevHash all of type bytes.
func (c *Cryptoblock) BuildHash() {
details := bytes.Join([][] byte{c.Data, c.PrevHash}, []byte{})
hash := sha256.Sum256(details)
c.Hash = hash[ : ]
}
- Now that we have the data and the previous hash, we can build a method to produce a new hash. We will use the “bytes” library; so, we will import it.
- The next step is to define the details variable with the data type bytes. The slice of bytes has to be connected using Join().
details := bytes.Join([][] byte{c.Data, c.PrevHash}, []byte{})
As you can see, we are passing a 2D slice of bytes, where we are passing the c.Data and the c.PrevHash. Then we will combine the empty slice of bytes.
- The next step is interesting as we are building the actual hash here, using the hashing function Sum256 on the variable details. Since we have imported the sha256 library, we are able to use this. Sha256 implements the SHA224 and SHA256 hash algorithms.
- Finally, we push the created hash into the Hash field of the block.
func BuildBlock (data string, prevHash [] byte) *Cryptoblock {
block := &Cryptoblock{[]byte{}, []byte(data), prevHash}
block.BuildHash()
return block
}
- As you can see we have created BuildBlock where we are passing the data string, prevHash [] byte. There is also an output of reference to Cryptoblock.
- We will build the block using the block constructor. We can see that the &Cryptoblock is acting as the reference to the block. In the case of Hash field, we incorporate an empty slice of bytes. We take the data string and turn it into a slice of bytes for the Data field. And for the PrevHash field, we just incorporate prevHash.
- Next, we are calling the BuildHash() on the block, and we are returning the block.
type BlockChain struct {
blocks []*Cryptoblock
}
- We have yet another struct, this time of BlockChain. It consists of an array of pointers to Cryptoblock.
func (chain *BlockChain) AddBlock(data string) {
prevBlock := chain.blocks[len(chain.blocks)-1]
new := BuildBlock(data, prevBlock.Hash)
chain.blocks = append(chain.blocks, new)
}
- Next, we create a method that will help us add a block to the blockchain. The method ‘extracts’ the BlockChain pointer. And then we pass a data string in AddBlock().
- In the variable prevBlock, we are calling chain.blocks and next we pass the length of the blockchain with [len(chain.blocks)-1].
- Inside the new variable, we call the BuildBlock function, and we pass the data and the prevBlock.Hash. Then in the next statement, we take the help of the append function and we add this to the chain.blocks. We then attach the new block to the blockchain.
func Inception() *Cryptoblock {
return BuildBlock(“Inception”, []byte{})
}
- We then create a function named Inception. This will help in describing the initial block of the blockchain. As you can see, we are returning a BuildBlock, and we pass the string (data) that we want in the first block along with a slice of bytes.
func InitBlockChain() *BlockChain {
return &BlockChain{[]*Cryptoblock{Inception()}}
}
- The purpose of the InitBlockChain() function is to create the first blockchain. All I am doing here is returning the reference to the BlockChain. Next, we create an array of Cryptoblock, and we make a call to the function Inception.
func main() {
chain := InitBlockChain()
chain.AddBlock(“First Block after Inception”)
chain.AddBlock(“Second Block after Inception”)
chain.AddBlock(“Third Block after Inception”)
for _, block := range chain.blocks {
fmt.Printf(“Previous Hash: %x\n”, block.PrevHash)
fmt.Printf(“Data in Block: %s\n”, block.Data)
fmt.Printf(“Hash: %x\n”, block.Hash)
}
}
- Now we get to the crux of the main program. We write the main function. We have created a chain variable and we have made a call to InitBlockChain().
- Following this, what we are doing is just adding blocks to the blockchain. And we pass a certain data along with it.
- Finally, we run a for loop. And we set the range as well. We consider each block and print out the necessary details associated with, as demonstrated below:
fmt.Printf(“Previous Hash: %x\n”, block.PrevHash)
fmt.Printf(“Data in Block: %s\n”, block.Data)
fmt.Printf(“Hash: %x\n”, block.Hash)
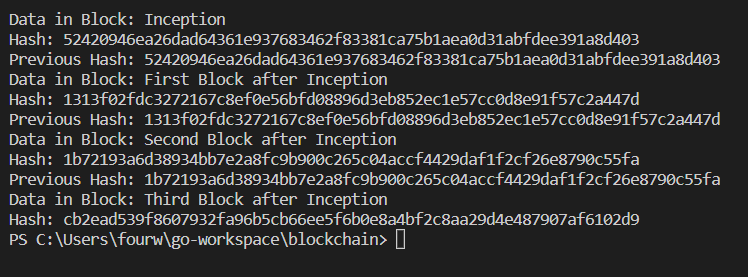
Output:

So, this proves that we have been able to create a blockchain. I presume you were able to grasp the concept of blockchain using the different libraries and packages available in Golang. When you create a sample blockchain of your own, you can increase the complexity by adding a few more parameters like block height, timestamp, etc.
AlexaBlockchain journalists were not involved in the creation of the article.


